How to Install/Flash Android O on your Nexus and Pixel Device
Android O brings several wanderful changes that can benefit users a lot. For example, the settings menu brings a better view than previous Android version, the background activity limit of Android O enables users to save battery life and improve performance and the PiP (Picture in Picture) mode give users much more convenience that to do other things while watching the videos, and the adaptive icons can bring users better aesthetic view. More new features in Android O please refer to: Android O (8.0) | Top Ten New Features Android Users May Like
Traditionally, the Android most likely to be released in late August or early September. Users who owned a Nexus or Pixel running Android 7.0 Nougat may can't wait for so long to experience the Android O. It is important to note that you first need to own the device such as the Nexus Nexus 5X, Nexus 6P, Pixel C, Pixel, Pixel XL, or Nexus Player, or a rooted device which can enable you to manually flash Android O.
Should I install the Android O on my Nexus or Pixel?
It is not so easy to install the Android O once you are not familiar with the commands. Android O will likely to update at least three times with new version that fix bugs and overcome some of the more core functionality issues. But if you decide to flash the Android O, the follow content will guide to do it.
Preparation of Flashing Android O
- A Nexus (Nexus 5X, Nexus 6P, Nexus Player) or Pixel (Pixel C, Pxiel, Pixel XL) or rooted device powered on with 50% battery power.
- Free Download KingoRoot on Windows which used as an alternative of Android SDK and ADB.
- Head to the official website to download the appropriate factory image which is compatible for your device to the PC.
- 7zip or a similar program is needed for handling .tgz and .tar files. Download 7zip for free here.
- Backup everything you want to keep since the process may wipe all the data of your phone.
Unlock the Bootloader of Your Nexus or Pixel
If your device has already been unlocked, then skip to the next step. If not, you should unlock the bootloader before manually installing Android O.
Unlock the bootloader of Nexus or Pixel:
- Go to "Settings" and scroll down tab "About Phone", then tap seven times on "Build Number" until the device delivers the message:"You are now a developer!"
- Head to "Settings" > "Developer Options" > "USB Debugging". Tap the USB debugging checkbox.
- Connect you device to the PC via an USB cable. If you fail to connect you device to PC, please refer to Device Not Connected.
- Install and launch the KingoRoot you have downloaded on your PC, the software would automatically download the driver of your device.
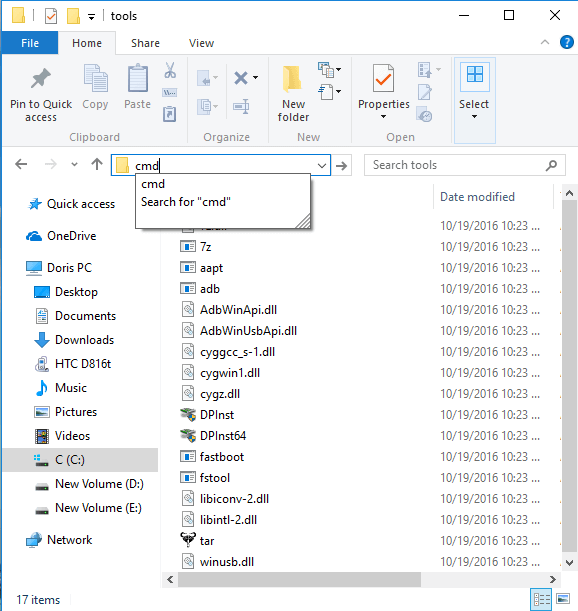
- Find the folder of KingoRoot where you install it, double click to open the folder of "Kingo ROOT". Then open the folder of "tools" under the folder of "Kingo ROOT".
- Input the letters "cmd" in the "address bar", and enter in order to pop up a command window on PC.
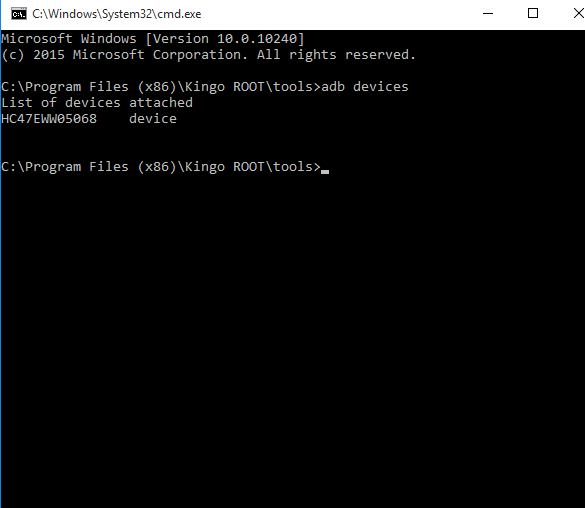
- The PC will pop-up a Command Prompt window, then run the command:
adb devices. - Run the command:
fastboot flashing unlockfor your Nexus. - Reboot your device by running command:
fastboot rebootor using the "Volume" buttons to reboot.
If it shows a serial number, your device is recognized and you can continue with the process. Otherwise, ensure you’ve performed the above steps correctly.
Manually Install/Flash Android O on Your Device
Please care about the following instructions in case anything goes wrong. With this in mind you can correctly flash the Android O.
- Repeat some steps in the "Unlock Bootloader" step. Still connect your device to the PC and pop-up the Command Prompt window, then ensure your device is recognized by testing it with command
adb devices. - Use 7zip to extract the .tgz file you have downloaded of factory image from the Android O website. A second time to extract the .tar file from the .tgz file you have extracted the first time by using the 7zip. When you’re done, you should have a folder with several files in it.
- Copy all of these files and paste them in the platform-tools folder of Kingo ROOT folder under Program Files (x86) under drive C on your PC.
- There are two flash-all files. Double click "Window Batch File" with the gear logo on the right for Window users. Double click the flash-all.sh for Linux users.
- At this point, the installation is taking place and you will see the pop up box. Do Not unplug your device.
- After finishing installation, your device will automatically reboot and you will see the boot animation of Android O start up. You can now unplug your device from your computer.
Now, you can experience all the new features the Android O brings you.
KingoRoot on Windows
KingoRoot Android on Windows has the highest success rate. It supports almost any Android device and version.

KingoRoot for Android
KingoRoot for Android is the most convenient and powerful apk root tool. Root any Android device and version without connecting to PC.

Top Posts
- Successfully Get Root Access On Android 10 (Google Pixle 3 XL) With Magisk
- How to Root Android without Computer (APK ROOT without PC)
- How to Root Android with KingoRoot (PC Version)
- Best Top 5 Root Tools to Safely Gain Root Access for Your Android Devices
- How to Root Your Android 10.0 with Kingoroot root APK and PC root
- How to Root Your Android 5G with Kingoroot root APK and PC root
- How to Root Android 9.0 Pie with Kingoroot Both root APK and PC root Software
- How to Root Android 8.0/8.1 Oreo with KingoRoot APK and Root Software
- How to Root Huawei Packed with EMUI 8 and EMUI 9 or Higher with Magisk
- How to Root Samsung running Android 9.0 Pie with Magisk