How to Encrypt a Rooted Android Device with Kingo SuperUser
An user who owns Android running Gingerbread( 2.3.x ) can experience full-device encryption and who own an Android device running Lollipop ( 5.0 ) and higher can have the "out-of-the-box" experience with dramatic changes of encryption. In other words, it is easy to encrypt Android running 2.3.x and higher.
Although Android is the world's most customizable mobile platform, it becomes even more customizable after rooting the device. That's why so many users have rooted their devices but want to encrypt their device due to security consideration.
What is Encryption?
Encryption is the science behind protecting any information stored on an electronic device, be it a phone, a laptop or a server. However, device encryption is not a one-stop solution for protecting all of your data and information, and it converts all the data into a form that can be only read with the correct credentials. Once encrypted, your music, photos, apps, and account data can't be read without first unjumbling the information using a unique key.
The data of Android device is stored in an unreadable form via encryption. Android uses dm-crypt, a transparent disk encryption subsystem in Linux kernel versions 2.6 and later. You enter your PIN and password on the lock screen, then the device encrypts the data to make it understandable. Without the PIN and the password, anyone could not enter the data.
Why You Want to Encrypt Android Device?
Encryption protect privacy information or sensitive data on the device. People rely on portable devices much more than before in this digital times. For example, a company phone with much sensitive business data should be encrypted to protect the data from stealing by corporate espionage. An average user who may not have sensitive data on device but much privacy information such as email content, family address and contact list. Although many thieves would wipe the data and sell the phone or access your data by a standard unlock code whether your device has been encrypted or not once your device has been stolen. But it never hurts to keep that stuff protected no matter for a stock or rooted Android device.
Consideration before encrypting your rooted Android device
Today many Android device ship with encryption already turned on by default and there is no way to disable encryption if you haven't rooted your device. But for many rooted devices without encryption should get knowledge of the following content.
- Inconvenient to use. Once a device is encrypted, you need to enter your password every time to access it. Therefore, you may see a bit of performance drop no matter your device is rooted or not.
- Unroot temporaily. Since you have rooted your device, you need to unroot you Android device temporarily if you want to encrypt it. After going through the encryption process, then re-root your Android device.
How to Encrypt a rooted Android Device
Preparation of Encryption
- Power on and at least 80% battery level.
- Encryption will take an hour or longer. Arrange your time.
- Keep your device being plugged in throughout the entire process of encryption.
Step by Step Encrypt Rooted Android
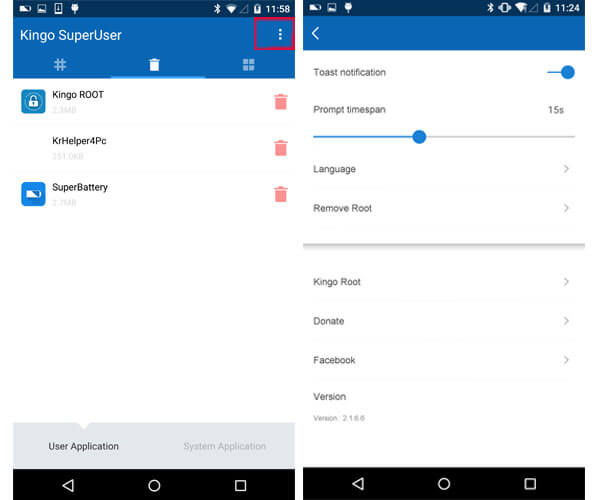
Step 1: Unroot your Android Device temporarily with Kingo SuperUser.
- Find the icon of Kingo SuperUser. If you have rooted Android device with KingoRoot APK, you will find the icon of Kingo ROOT and Kingo Superuser.
- Update the Kingo SuperUser. Update the kingo SuperUser to the latest version and launach it, then tap three dots upper right, then find the option of "Remove Root".
- Tap "Remove Root". Tap “Remove Root" and click "CONTINUE".
- It's done.
Due to technical reasons, sometimes the files may not be completely deleted. If the files are not completely removed in this way, please refer to the first method and removing root via Kingo Android Root ( PC Version ).
If you have rooted your Android by other root tool. Please refer to How to Completely Remove Root, SuperUser and Related Files.
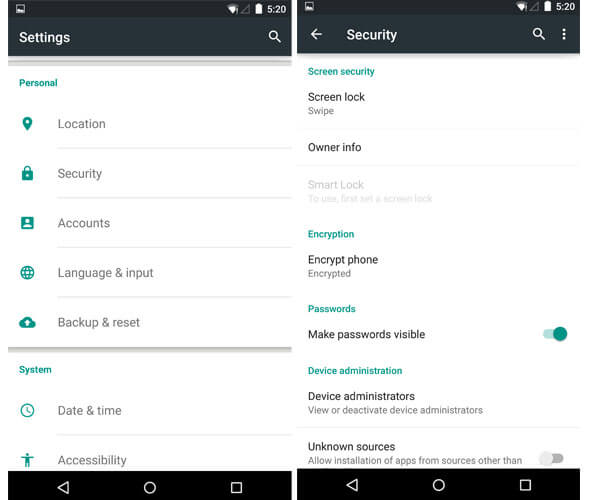
Step 2: Go to "Setting" menu and tapping on "Security".
If your device have already been encrypted, it will show up here: Encrypted.
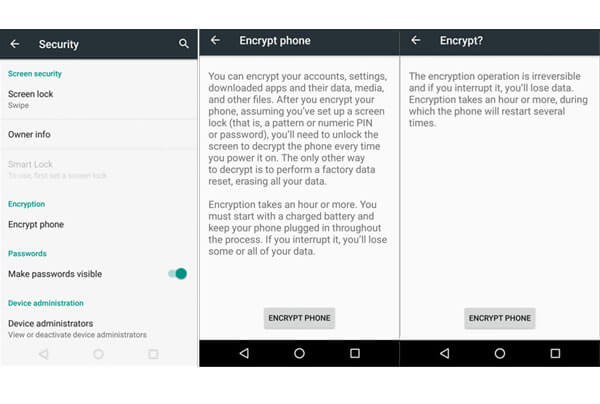
Step 3: If your device haven't encrypted, then start the process by tapping the option of "Encrypt phone"
By tapping the "Encrypt phone", the screen will soon show you a warning. If you already to proceed, then tap "ENCRYPT PHONE". One more warning will show here in order to tell you not to interrupt the process. Tap "ENCRYPT PHONE" if you already prepare for encryption.
Step 4: Waiting until Process to Finish.
The phone will then reboot and start the encryption process. A progress bar and estimated time till completion will show up, which should at least provide an idea of how long it will take.
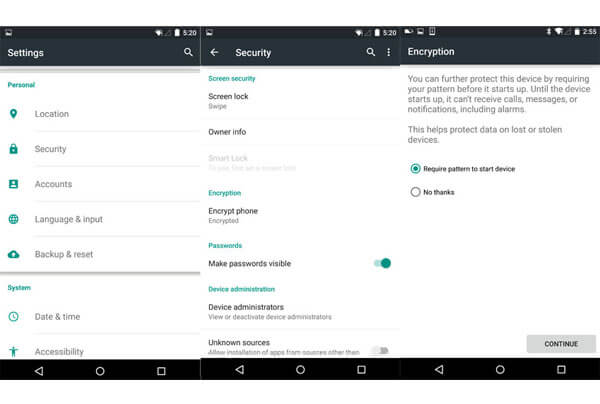
Step 5: Setup a lock screen if you haven't.
Go to "Setting" > "Security" > "Screen lock". Choose one from these three "Pattern", "PIN", "Password". Then, you will be asked if you want to require the "Pattern" at startup. It is up to you, but "yes" is recommended due to consideration of security.
Step 6: Re-root your Android device with KingoRoot apk.
You may used to use a rooted device. KingoRoot apk is a one click root tool for almost Android device. Just a few simple steps can get you a rooted device within minutes.
- Free download KingoRoot.apk.
- Install KingoRoot.apk on your device.
- Launch "Kingo ROOT" app and start rooting.
- Waiting for a few seconds till the result screen appear.
- Succeeded or Failed.
Detail tutorial please refer to: How to Root Android without Computer (APK ROOT without PC)
KingoRoot on Windows
KingoRoot Android on Windows has the highest success rate. It supports almost any Android device and version.

KingoRoot for Android
KingoRoot for Android is the most convenient and powerful apk root tool. Root any Android device and version without connecting to PC.

Top Posts
- Successfully Get Root Access On Android 10 (Google Pixle 3 XL) With Magisk
- How to Root Android without Computer (APK ROOT without PC)
- How to Root Android with KingoRoot (PC Version)
- Best Top 5 Root Tools to Safely Gain Root Access for Your Android Devices
- How to Root Your Android 10.0 with Kingoroot root APK and PC root
- How to Root Your Android 5G with Kingoroot root APK and PC root
- How to Root Android 9.0 Pie with Kingoroot Both root APK and PC root Software
- How to Root Android 8.0/8.1 Oreo with KingoRoot APK and Root Software
- How to Root Huawei Packed with EMUI 8 and EMUI 9 or Higher with Magisk
- How to Root Samsung running Android 9.0 Pie with Magisk